

Nighttime Accident and Crime Scene Photography "Painting With Light"
Robert E. Kramer
Police Division
Cedar Falls, IA
Introduction
Photographs taken at the scene of a traffic accident are a most critical part of the investigation. Most law enforcement investigators are familiar with the term: "...a true and accurate depiction of the scene..." It is important that law enforcement personnel assigned the task of photographing traffic accidents understand more than just the basics of camera operations and film exposure, so that photographs taken will truly represent the scene as it was at the time of the investigation. It will be the purpose of this article to address many of the problems facing the law enforcement photographer at the scene of a nighttime traffic accident or crime scene. Since this article will deal with the specific technique of painting with light, a basic knowledge of camera operations and accessory functions is necessary.
Difficulty Factors
Olympic competitors are confronted with difficulty factors as they perform their gymnastic and diving exercises. It could probably be argued that most novice swimmers could stand at the edge of a three meter board and complete a simple dive into the pool with some degree of grace. The same can be said for the beginning photography student. Simple photographic situations such as those during the daytime with a bright sun and high sky are easily mastered. It's when a factor such as steady rain, heavy snow, a bright sun low on the horizon, or nighttime is encountered that the photographer is truly put to test. My experience has found that the nighttime traffic accident is one of the more challenging scenes to photograph, particularly when skidmarks and/or other evidence is scattered over a great distance. Simply put, the camera does not see what you see. Have you every stood outside under the stars and noticed that, up to a certain point, you tend to see more clearly as time passes? Your camera cannot do this. The adjustments you as the photographer make in such things as camera position, time of exposure, and supplemental lighting will be the deciding elements as to whether your camera allows the film to "see" as you do.
Equipment
The key to any law enforcement investigation is to be prepared, and photography is no different. Preparedness includes necessary training, but the classroom needs to be followed with equipping the student with the proper tools. For this reason, the following items are suggested as essential to any camera kit, and in particularly, one to be used for nighttime accident work. The function of each item, and reasons for being crucial in nighttime accident photography will be discussed in detail.
1. It is important that the camera kit include a manual camera with adjustable shutter speeds and a "B" (bulb) setting. This "B" setting allows the shutter to be opened for an indefinite period of time, which allows for time exposures of as long as the photographer deems necessary. It has been suggested many times that an automatic camera can be used so that time consuming camera adjustments can be held to a minimum at the scene. I argue against this point for two main reasons. First of all, the automatic camera is at its best when the existing light at the scene enables the built-in metering system to make adjustments of the f/stops and shutter speed. The key words here are existing light. In nighttime accident photography there is no existing light, or rather there is very little of it. Automatic in-camera adjustments are impossible, making the need of a manual camera a must. Secondly, by mastering the basics of shutter speed and f/stop adjustments, the photographer will come to better appreciate the importance of these two necessary steps in nighttime photography. With this understanding and practice, adjustments of the camera and lens at the scene will be as systematic as loading the film.
2. A normal lens with adjustable f/stops makes a perfect match for the manual camera. Whereas the camera houses the shutter, the lens itself contains the aperture. The aperture within the lens controls the amount of light which is allowed to pass through the lens and strike the film at the back of the camera. This control is made possible by f/stops which range from f/2 (a very wide aperture opening,) and f/22 (a narrow opening.) The term depth of field is familiar to most photography students, and it is a word which scares many off to another discipline. Simply put, depth of field is the amount of the scene (distance in front of the camera from its closest to farthest points) which is in focus. Although depth of field is something not of a major concern in nighttime photography, (this will be explained later), one should still understand that setting the lens aperture at f/2 will yield very little depth of field, and f/22 will dramatically increase the amount of depth of field.
3. A remote cable release is necessary so that the shutter can be "tripped" without having to touch the camera. Painting with light is done with very long exposures (sometimes as long as several minutes) so it is very important that camera movement be eliminated if possible.
4. The camera will be mounted on a tripod during the photography and, with the cable release, will help eliminate the unwanted camera movement. When buying a tripod, look over the options and get a good one which will survive the wear and tear which it will receive by bouncing around in the trunk of your car. Make sure it is sturdy enough to withstand a good breeze, and pay attention to the leg adjustment controls. Experience has shown me that the old fashioned screw-type collars are much more durable than the clamp controls which I see on some of the newer tripods. And one more thing, make sure the tripod has a camera base (where the camera attaches to the tripod) which allows for full movement of the camera in tilt forward and tilt back, as well as left and right directions.
5. An powerful external flash will be essential in illuminating the one hundred and fifty feet of skidmarks at the nighttime accident. How much power is necessary? Without getting into details on explaining a flash guide number, I would just suggest visiting a reputable camera store. Explain to them what you plan to do, and they will steer you toward a good flash unit. Be prepared to spend $200.00 or more. And remember ... this same flash unit can be used during routine flash photography at distances as close as a few feet. Spending money to buy a good flash unit will make flash photography of both the basic and technical scenes a possibility.
6. A rechargeable external battery for the flash is optional, but suggested. Painting with light involves illuminating the scene with multiple flashes on a single frame of film. Since several angles of the scene may be photographed, it would not be unheard of to illuminate a frame of film with twenty or more flashes on full power output.. For this reason, it is suggested that a rechargeable battery be used during the painting with light technique. The rechargeable battery recycles quickly and holds considerable more power than the standard nicad or lithium batteries. Brand names are not important, but the battery pack I have has been known to yield me in excess of three hundred flashes on a single charge, so it is easy to see the benefit of such an accessory.
Learning by Trial and Error
The process involved in painting with light is easily mastered with proper preparedness and practice. You wouldn't wait until the day on which you are encountered with a string of safe burglaries at mall stores to learn proper latent fingerprint techniques would you? If sometime in the future you may be called upon to take nighttime accident of crime scene pictures, now is the time to prepare yourself for the task by realizing the special considerations which will be encountered. It has already been mentioned in this article that the camera does not see what your eyes can. You, as the photographer, need to help the camera to see by supplementing existing light at the nighttime scene with artificial lighting, an extended time exposure, or a combination of both.
In classes which I teach at the Hawkeye Community College I assign students to take a number of photographs as they study the section on Painting with Light. One of the first photos taken is done in an outdoor setting of a subject matter fifty feet away from the camera position with a shutter speed of 1/125th second and an f/stop of f/8. The student has the option to have street lights or other existing light present in the area. When these initial photographs are viewed, many of the students comment that they could easily see the subject matter which they were photographing when the picture was taken, but that it was not visible in the print. If the subject matter was an automobile, they were possibly able to see light reflecting off a license plate in the print, but the car itself was lost in the dark background. What a perfect illustration of the point I'd been trying to make to them! A follow-up photo in the assignment would be to take a picture from the same location, looking at the same subject matter, using the same camera settings, and illuminating the scene with one flash from any flash unit they may have brought to class with them. The finished photos were again, usually very dark, with the subject matter considerably underexposed. Some of the students were sometimes heard commenting that they thought their flash was good for up to a distance of fifty feet. The point made here was two-fold. Again, it may appear that as they took the picture the scene was illuminated with the single flash. This is not always the case, as again the eyes of the photographer were more sensitive to the flash going off than was the camera and film. Secondly, the photographer should never assume that just because the flash may have an automatic or manual range up to fifty feet, proper exposure of subject matter at that distance will be obtained. I live by the rule that I should assume proper flash exposure at two-thirds the distance as indicated or suggested by the manufactures specifications. I've argued this many times with other photographers, but again - it's something that seems to work well for me.
The Technique
It is often only after the student has seen photographs taken such as those described in the previous section that they realize nighttime photography poses many problems they may not have encountered in previous photographic situations. Since it will impossible to conduct a mock accident scene as I would during a class, the following is an accident scenario which will be supplemented with two photographs.
The Accident Scene
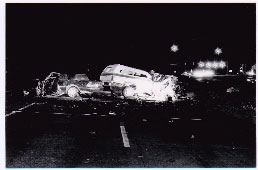
This particular accident scene confronted me with a number of problems I have encountered as I have been called to accident scenes at night. The scene was a divided four lane highway and the accident involved two motor vehicles. The northbound vehicle was an extended cab pick-up truck with topper, with a driver, front seat passenger, and two rear "jump seat" passengers. The southbound vehicle was a two-door sedan with the driver as the lone occupant. The accident occurred at about 11:00 pm and the only lights in the area were traffic signals at an unrelated intersection about two-hundred and fifty feet south of the accident scene. There were also four pole-mounted street lights at this intersection. As the northbound vehicle passed the intersection it would have had to negotiate a slight curve to the north-northwest. The southbound vehicle had negotiated the slight curve to the south-southeast. For reasons unknown, the driver of the southbound vehicle failed to negotiate the curve back to the south. The southbound vehicle crossed the grassy median, entered the northbound lanes of travel and the two vehicles collided head on. The driver and front seat passenger in the northbound truck as well as the driver of the southbound vehicle were all killed instantly. The rear seat passengers in the northbound vehicle survived. I arrived at the accident scene approximately fifteen minutes after it occurred. Paramedics, Fire Division personnel and the Police were already on the scene, so I was not needed to assist with aid to the injured. I bring this up for the main reason that the initial action taken at the scene of an accident by any emergency personnel is to aid the injured.
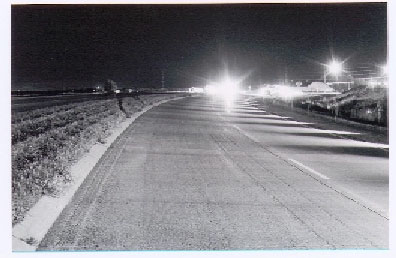
I began my duties by taking a number of close-up pictures of the two vehicles, their damage and evidence strewn about the scene. These initial photographs were taken with 400 speed color film (I prefer AGFA Optima.) After the deceased and injured were removed and the scene was secure I began the task of taking photos from considerable distances, showing the approach both vehicles had as they came upon the scene. One of the photos was shot from approximately 500 feet north of the accident scene. I wanted to illustrate in this photo the tire tracks from the southbound vehicle as it crossed the median and entered the northbound lanes of travel. I obtained the photo in the following manner:
1. The camera, a Pentax 645 120mm was loaded with T-max 100 asa black and white film. I prefer black and white as opposed to color film when taking photos with this technique, as I am better able to correct under and over-exposures in the darkroom when making enlargements.
2. The camera was mounted on a tripod with the shutter on the bulb setting, and aperture on f/11. (I preferred a moderate degree of depth of field for this photo, due to the distance I was from the accident scene.)
3. All unnecessary lighting from the emergency vehicles present were turned off. My experience has shown that lights shining from vehicles at the scene during the time exposures are amplified several times over in intensity when the photo prints are made. Eliminating these lights, if possible, make for a more pleasant photo and lessen the chance that important evidence may be obliterated.
4. ALL moving traffic was eliminated. This accident scene was in a remote area of town so the task was not difficult and was done with the aid of only two Officers, one to the north of me, and one to the south.) Stopping traffic is essential in the painting with light technique.
5. The Sunpack model 500 series flash unit which I use was attached to a fully charged Quantum battery pack. I have previously mentioned in this article the importance of a strong flash and supplemental battery pack, and this accident scene was an excellent example of illustrating the need for both.
6. I advised Officers directing traffic that I was about to begin the process, and I tripped the shutter of the camera and locked it open. I then walked (at a brisk pace) to a point near where the two vehicles came to rest and began illuminating the scene with full-power flashes from the Sunpack. I was careful to fire the flashes across the southbound lanes of travel at an angle away from the camera as I wanted to reduce the chance that I hot spots from the flash would show in the finish print(s). I also fired the flashes at an angle very low to the ground, as the main purpose of this particular photo was to illustrate the tire tracks in the median. I felt that by I would best do this by casting a shadow across the tracks. Walking backwards, I continued firing flashes across the southbound lanes of the highway until I got to the camera position. I then closed the shutter with the cable release.
The importance of starting the process of "painting" at a point furthest from the camera and walking back to the camera position while firing flashes cannot be stressed enough. Many people ask why, if a flash illuminates the scene several times on each frame of film, there are not an equal number of images of the photographer in the finished print. The answer is simple if the technique was done correctly. By beginning at the furthest point from the camera and firing repeated flashes walking back toward the camera, each subsequent flash "covers up" the image of the photographer during the previous flash.
The photo which you see is not the only picture I took at the scene using the painting with light technique, and in fact is not the only one I took from this particular camera position. The point here is that several shots need to be taken in order to be certain that good pictures are obtained. Setting up the tripod, stopping traffic, and eliminating unnecessary movement in the view of the camera is the difficult part. Why not take a few extra minutes at the scene and take a few more time exposures while exposing the scene with a varied number of flashes from different angles?
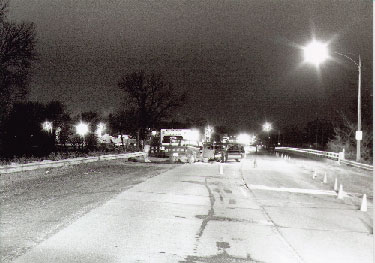
Mid-Range Photos
An additional photo taken at this scene illustrated the slight curve in the road for northbound traffic.
This photograph was taken to show the final resting positions of the vehicles, the view for northbound traffic, and the absence of roadway obstructions and/or skidmarks. Painting with light works well when taking photos at this range. "Background noise" such as street lights and traffic lights is usually less than what is encountered in long-range shots. Many of the difficulty factors encountered in mid-range painting photography are controllable. For one thing, there is less chance of moving traffic in the background interfering with the photography. In addition, pedestrians are easily controlled with as few as one additional Officer, and harsh background lighting (street lights) is less evident. Finally, the photograph takes less time from start to finish as the number of flashes used is less and considerably less walking around within the scene is necessary. A second example of a mid-range photo using the paining technique is shown.
This accident clearly indicated the lack of skidmarks on a dry pavement at the scene. Only one street light (right - foreground) caused me difficulty while composing the shot, and traffic control was easy as the scene was a two-lane lightly traveled road. This scene was a perfect chance to practice the technique and at the same time obtain photos not possible with conventional flash photography.
Conclusion
I've been around law enforcement long enough to believe that nothing in this line of work will intimidate me so much that I would be afraid to try it during an actual investigation. Anyone can sit in a classroom and look at some slides which illustrate a technique being explained by the instructor. It takes dedication to apply skills learned during practice in order that they are performed as routine "in the field." I encourage each and every one of you to take the time to familiarize yourself with the technical aspects of your job ahead of time.
Article submitted by the author.