

Use of Reflective Ultraviolet Photography to Photo-Document Bruising to Children
Detective Patrick Cochran
Austin (Texas) Police Department
Child Abuse Investigations
See also the instructional videos on "Evidence Photography"
Definition
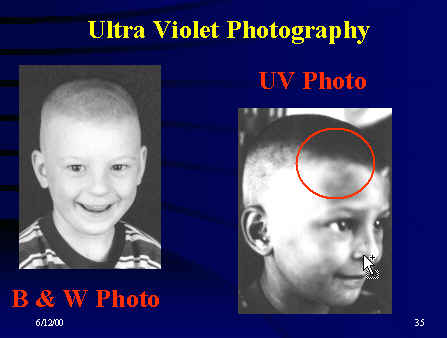
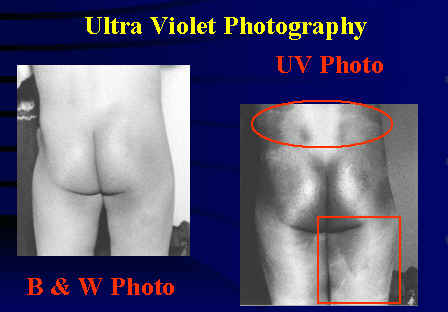
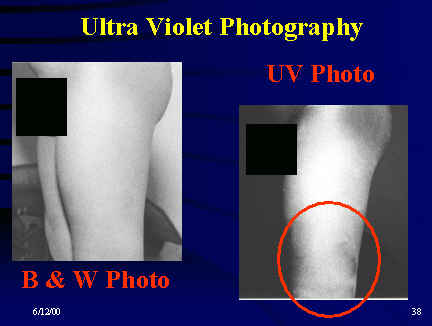
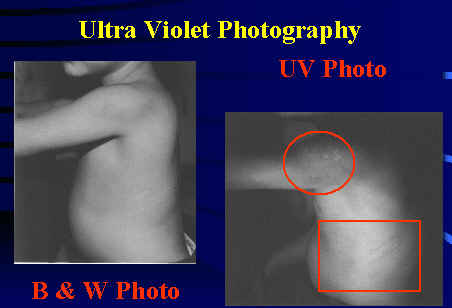
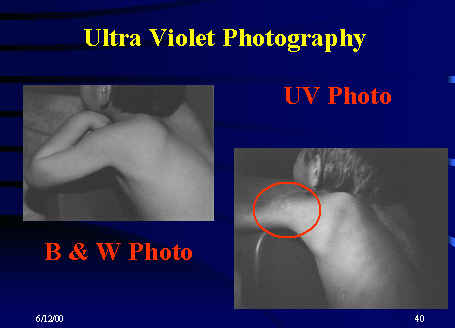
Reflective ultraviolet (UV) photography records the reflection and absorption of long-wave UV light by the subject matter excluding exposure of the film by all visible light.i Simply said, long-wave UV light penetrates deeper into the skin than does visible light. Therefore, by placing a specially designed filter over the camera lens, one which will only allow a specific wave-length of UV light (less than 400 nanometers), we can expose the film to only this light. Since UV light penetrates deeper into the skin, the film will pick up the image of a bruise or bite mark, which has been absorbed too deep into the skin to be able to be seen using visible light.
Time frame
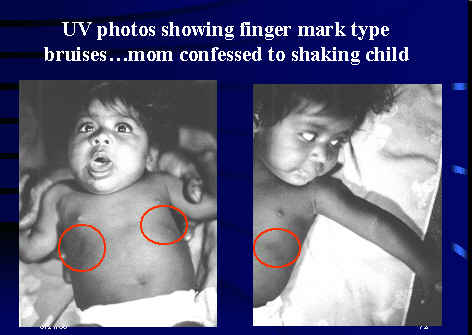
The time frame to obtain good results with this technique has never been fully explored. The earliest time in which these photos seem to show any image, is shortly after the bruise or bite mark is no longer visible. The longest time, in which there is literature, is at least 5 months after the injury.* I have personally taken photos of an infant's injuries (bruising) that were almost 3 months old and I was still able to see finger marks on the infant's chest, where there child had been shaken. Photos taken using this technique will not show bruises that are still visible.
The good news
Reflective UV photography will show bruising or bite marks that are no longer visible. Since tattoos, birth marks, and Mongolian spots are located deeper in the skin than UV light penetrates, these things can be "photographically removed" from your photos.** In other words, the photos taken with this technique will not show any tattoos, birth marks, or Mongolian spots. Therefore, bruising that would otherwise be hidden by this things will show up on the UV photo. There is no special training, other than knowledge of how a 35 mm camera is operated, that is required to obtain good results with this method. Besides a good 35 mm camera, the only expensive piece of special equipment required for this technique is the "Kodak Wratten 18A" filter, which costs in the neighborhood of $500.
The (not-so) bad news
The most significant problem with this technique is two-fold. First, since the bruise or bite mark is not visible, you must take numerous photos to make sure that any possible injured area is photographed. Second, because most 35 mm cameras focus through the lens, once the UV filter is in place, the camera can't be focused (This may not necessarily be true for auto-focus cameras, as most will still focus through the filter). Of course this means that the camera must be focused, than the filter installed without the subject moving out of focus.
The equipment
Of course you must have a 35 mm camera. The Austin Police Department, will be using a 35 mm camera fitted with a Nikon "micro-NIKKOR" 55 mm lens. Additionally, the film used must be sensitive to a light wave length of 300-400 nanometers. Most literature that I have read suggests the use of the Kodak T-Max 400 black and white film. There is no advantage in using color film when taking UV photos. A standard flash will work as long as it produces UV light, which most do. Lots of light is the key to good photo's, so I use a standard flash mounted on the camera's hot shoe, and a second standard flash with a remote trigger that I can hold in my hand and get it very close to the subject. A tripod is also necessary since the camera must be focused, then held still while the filter is installed. Finally, a KODAK WRATTEN 18A Filter, and holder must be purchased. I suggest a holder that allows the filter to be placed on the camera quickly and without moving the lens, since the camera will be focused, and the subject sitting still. A manual cable release is also useful, as it allows the shutter release to be pressed without any camera movement.
The technique, step-by-step*
- The camera is loaded with the appropriate film, shutter speed set at 1/60s, and flash synchronization is set for electronic flash.
- Mount the camera on a tripod. The best UV photos are taken parallel with the subject. You must adjust the tripod so that as little of an angle as possible exists between the subject and lens.
- Position the victim comfortably about 12 - 14 inches from the lens. Again, insure that film plane and bite mark or bruise plane are parallel.
- Take a visible light (unfiltered) photo of the area you are about to take a UV photo of, and some general orientation photos.
- Focus the camera, instruct the victim that you will be taking a series of about 3-4 photos, and they must keep their movement to a minimum during the process. Place a ruler or other measurement device on the injured area, being sure not to block the injury itself. Re-check the camera focus. Then place the UV filter on the camera, and take several exposures, using f-stops f-5.6, f-8, and f-11. In order to achieve optimum results, you can then hold your flash or light source in a different relationship to the injury and re-shoot, using the same f-stops. Lots of light is the key to good photos. Make sure the flash is pointed in the direction of the injury.
Finally
Prints made from the use of ultraviolet photography look like regular black and white photos. When this film is developed, it is treated as any other film, and can be made into slides, prints, or enlargements. The use of ultraviolet photography can greatly enhance an investigation by showing a history of injuries, or even the specific outline of the weapon used to cause an injury.
Make sure to take a few rolls of test photo's before actually going out and starting to photograph victims.
Footnotes
* Krauss, T.C. and Warlen, S.C., "The Forensic Science Use of Reflective Ultraviolet Photography," Journal of Forensic Sciences, JFSCA, Vol. 30, No. 1, Jan. 1985, pp. 262-268
** Frair, John, "Ultraviolet Forensic Photography," TECH BITS, Issue #2, 1989. Reprinted from KODAK manual # AM-102 KIC, pp. 7
Article submitted by the author.