Evidence Photography — At the Crime Scene
Steven Staggs
© 2014 from the book Crime Scene and Evidence Photography, 2nd Edition
Overview
Several types of evidence are commonly found at crime scenes. Each item of evidence must be documented photographically, showing its location and appearance. In the previous chapter the basic concepts of evidence photography were discussed. This chapter provides more specialized techniques for photographing evidence commonly found at crime scenes.
As you study this chapter, be aware that many of the techniques in this chapter can also be applied in a laboratory setting. For example, fingerprints on an item that will be collected as evidence may either be photographed at the scene before packaging or later in the laboratory. Several factors may be considered in this example. It may be safer to photograph the fingerprint at the scene if there is a chance the fingerprint will be damaged when the evidence is transported to the laboratory, or it may be more effective to photograph the fingerprint in the laboratory due to the specialized lighting available on a copy stand. It will be up to the crime scene photographer to determine which would be the best course of action for each item of evidence.
See also the instructional videos on "Crime Scene and Evidence Photography"
Footwear Impressions
Footwear and tire impressions are perhaps the most overlooked evidence at a crime scene. When impressions are collected it is possible that identifications can be made linking a suspect or vehicle to the crime. Impression evidence can be collected by casting (filling the impression with a compound that hardens and retains the shape and characteristics of the impression) and with photography. Photographs of impressions are often used to make positive identifications, but casting of impressions provides the best evidence. This is because impressions are three–dimensional and casting preserves three–dimensional evidence. The depth of tread and imperfections on the sides of the tread are preserved with casting. At major crime scenes impressions should be photographed before they are casted. Photography is done first because casting the impression will destroy the original impression and eliminate the ability to photograph the impression afterward. Also, photographs of an impression are taken in case there is a problem with the cast. If the casting fails, the photograph may be used to make an identification.
At minor crime scenes impressions are usually photographed without casting. If the impression is properly photographed positive identification linking a suspect or vehicle to the crime is possible.
 |
 |
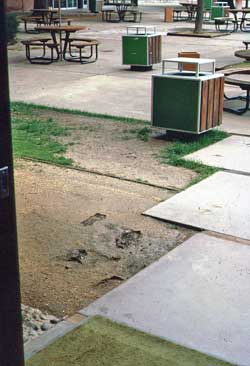
When taking photographs of footwear or tire impressions begin with a photograph to show where the impression is located in the crime scene. It is important to include a recognizable landmark in the photograph so the location of the impression is understood. If the impression is near a landmark, such as in a flowerbed at the corner of a house, a mid–range photograph probably would be adequate to show the location of the impression. If the impression is farther away from a recognizable landmark, such as an impression on a dirt driveway twenty yards from the house, additional photographs would be necessary. An overview photograph showing the driveway with the house in the background would be followed with a mid–range photograph of the impression on the driveway. It may be necessary to include an evidence marker in both the overview and mid–range photographs to clearly show the location of the impression in the photographs.
There may be times where it is not possible to show the exact location of an impression with photographs. The impression may be located in an area with no recognizable landmarks nearby, such as in an open area of the desert. In this case the use of a GPS device (to give location) and a compass (to indicate direction the evidence is oriented) may be the only way to document the exact position of the impression. In such a case you could record the GPS information in your notes, and in the photograph of the impression include an arrow that is oriented to indicate north.
 |
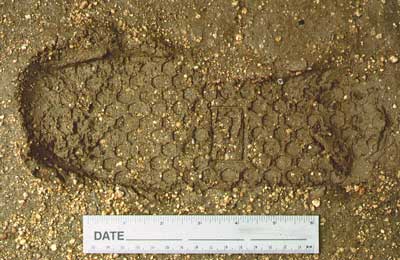
After photographically documenting the location of the impression you must take close–up photographs to show the detail of the impression. If you are using a film camera it is best to photograph impression evidence with black–and–white film. Black–and–white film provides more contrast and detail than most color films.
When photographing with a digital camera all photographs should be taken as RAW file images in color mode. RAW files are uncompressed and will capture more detail than JPG or TIF file images. By photographing in color, subtle tones that could be lost when photographing in black–and–white mode will be captured. Later the color digital photograph can be changed into grayscale in a program such as Adobe® Photoshop®.
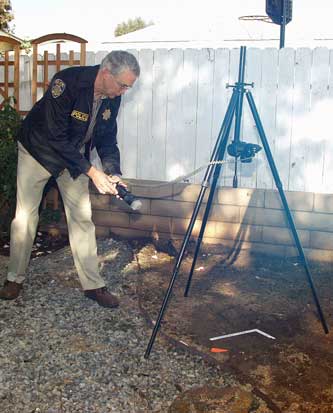
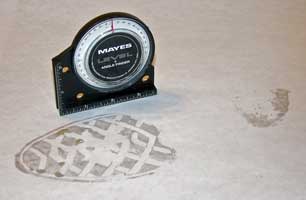
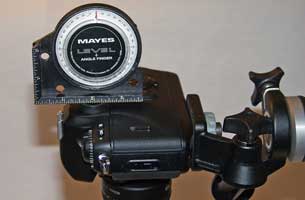
To take a close–up photograph of an impression, place the camera on a tripod and position the camera so the camera's film plane is parallel with the impression. This will minimize distortion in the photograph. An angle finder can be used to measure the angle of the impression and then, by placing the angle finder on the camera's eyepiece, the angle of the camera can be adjusted to match the angle of the impression. The film plane will then be parallel to the impression.
Next, place a scale alongside the impression. When photographing a footwear impression use an “L” shaped scale. When photographing a tire impression use a long straight scale alongside the impression. Place the scale approximately one inch away from the impression and on the same plane as the impression. If necessary, press the scale into the ground until it is the same depth as the impression.
 |
 |
Orientation of the impression is also important. The direction a footwear impression faces could be important to the investigation. For example, in a residential burglary it would be important to show that the footwear impressions in a flowerbed face the window that was used by the suspect to enter the residence. Showing the orientation can be accomplished with a mid–range photograph that includes the window and the impressions. If it is difficult to see the orientation of the impressions in the mid–range photograph, an arrow (indicating north) can be included in both the mid–range and close–up photographs.
In order to get as much detail recorded on the film as possible, your camera should be positioned so the frame of your viewfinder is filled with the impression and scale.
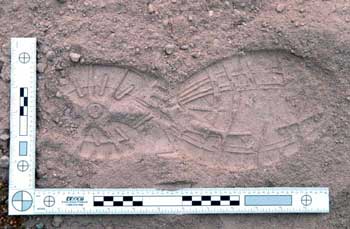 |
Most of the detail recorded in an impression photograph will be visible due to the small shadows that appear within the impression. The existing shadowing from daylight does not always provide the best results. The position of the sun may actually provide the least desirable results. If you settle for the lighting provided by the sun you will usually have poor quality impression photographs. In fact, it is necessary to take several photographs of each impression, with the lighting from different angles, to show all the detail within an impression.
The most effective way to insure you are using the best angles of lighting is “preview the photograph” by looking at lighting from several different angles. To do this, shade the impression with a large piece of cardboard. Then, position a strong light source, such as a powerful flashlight, at different angles to find the light angles that show the best detail in the impression. As you move the lighting you will see the results you will get by looking into your viewfinder. Then position your electronic flash at the best angles for the photographs. You will usually need two people to help you with this technique—one to hold the cardboard and the other to move the flashlight and position the electronic flash.
Another lighting technique would be to take a series of photographs with the electronic flash or light source at six different angles. Two photographs would be taken from each of three directions, one with the electronic flash positioned at a 25 degree angle and the other positioned at a 45 degree angle. You will probably want to use a lower angle for impressions in dust and for very shallow impressions, and a higher angle for deep impressions.
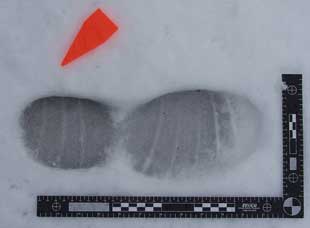
Impressions in snow are photographed with the same techniques detailed above. One additional issue with photographing impressions in the snow is exposure. Remember that the camera’s metering system provides settings for normal lighting which is 18 percent reflectance. Since the subject matter in the photograph is almost all white, the meter will provide exposure settings that result in an underexposed photograph. Much of the detail in the photograph will be lost. When using ambient light for photographs in the snow you can insure accurate exposures by using an 18 percent gray card. Position the 18 percent gray card in front of the camera lens to obtain the correct exposure settings. Be sure the ambient light is falling on the 18 percent gray card the same as it is falling on your evidence. Use the settings indicated by the exposure meter for the photograph. In many cases, bracketing should also be considered. Bracketing will provide a series of photographs at different exposures. Later, the best exposures from the series of photographs can be used for the investigation. This applies to the overview, mid–range and close–up photographs of snow scenes and evidence.
 |
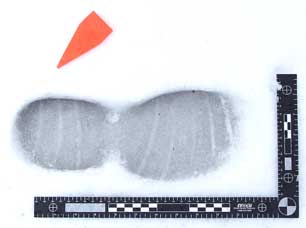 |
When using an electronic flash to photograph footwear impressions in the snow it is likely your photographs will be underexposed. This is because the automatic and TTL electronic flash systems are designed to control the duration of the flash by reading the light reflected off normal subjects. Since the snow will reflect more light than a normal subject the automatic and TTL systems will usually shut off the flash before an adequate exposure is made. The resulting photographs can be underexposed by about two f–stops.
You can adjust your camera to gain back the two f–stops of exposure. When using an automatic camera adjust the camera’s exposure control setting to a setting of +2. When using a manual camera close down the lens aperture by two f–stops (e.g. if a normal flash photograph requires a f/11, change the aperture to f/5.6). In many cases, bracketing should also be considered. Bracketing will provide a series of photographs at different exposures. Later, the best exposures from the series of photographs can be used for the investigation.
 |
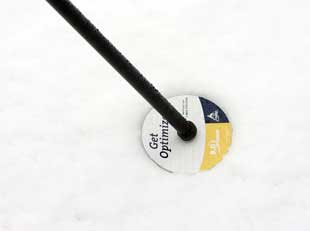 |
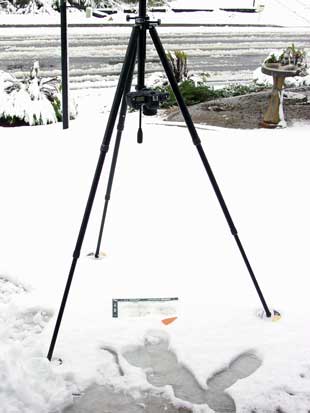
When working with a tripod in the snow it is sometimes difficult to steady the tripod when it tends to sink into the snow. Placing computer or audio compact disks under the tripod legs will help stabilize the tripod. This same technique works when using tripods on mud or sand.
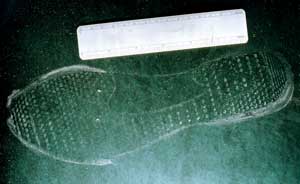 |
Dusty footwear impressions are sometimes found at crime scenes. They can sometimes be detected by shining a strong light source at low oblique angles across surfaces such as floors, doors (e.g., suspect kicked open a door) and victims’ bodies (e.g., victim was stomped to death). This type of footwear impression is best photographed with light from a low oblique angle.
Dusty footwear impressions can also be collected with gelatin lifters, static dust lifting materials, and electrostatic dust lifters. Each of these techniques causes the dust to adhere to the lifting medium. Once the dust impression has been lifted, the impression is usually preserved with photography. When photographing a lifted dust impression position the camera with its film plane parallel to the dust impression, place a scale on the same plane as the impression, and photograph with light from a low oblique angle.
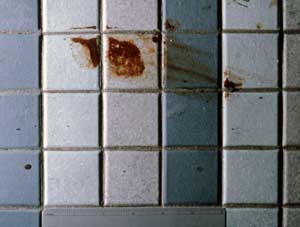 |
Impressions in materials such as blood, grease and oil, which are visible with existing light, may be photographed with ambient (existing) light or with indirect electronic flash (the flash is not pointed directly at the impression). However, it is always best to “preview the photograph” by looking at lighting from several different angles as well as the result of ambient light. To do this, position a strong light source, such as a powerful flashlight, at different angles to find the light angles that show the best detail in the impression. As you move the flashlight you will see the results you will get by looking into your viewfinder.
Tire Impressions
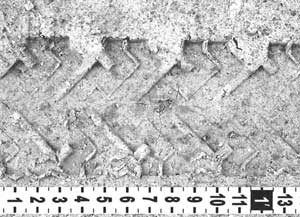 |
The technique for photographing a tire impression is similar to photographing footwear impressions. However, you must photograph tire impressions in enough sections to show one circumference of the tire. Place a long scale or tape measure alongside the tire impression. The numbers on the scale must be large enough to be clearly seen in the photograph. Take three or four overlapping photographs to show enough tire impression for one full circumference of the tire. Do not move the scale while taking the photographs. Later, the series of overlapping photo-graphs can be pieced together by matching the scale in the photographs.
When photographing tire impressions remember to use the same techniques of lighting and camera and scale placement as discussed earlier for footwear impressions.
Tool marks
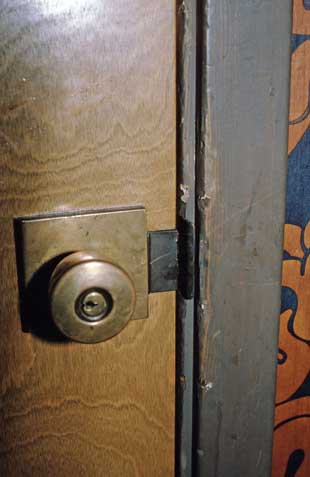
Tool marks are often found at crime scenes. They can be marks left from pry tools, such as crowbars and screwdrivers, marks on a doorknob left from adjustable pliers used to gain entry in a burglary, or other tools used in the commission of a crime. When a tool mark is collected it is possible that a positive identification can be made linking a tool to the crime.
Tool mark evidence can be collected by casting and by photography. Photographs of tool marks are often used to make positive identifications, but casting of tool marks yields the best evidence. This is because a tool mark is three–dimensional and casting preserves three–dimensional evidence. Casting of tool marks is done with casting putty. At major crime scenes tool marks should be both casted and photographed. At minor crime scenes tool marks should be photographed even if it is decided not to cast the tool marks.
In some cases an item bearing a tool mark can be collected as evidence (e.g., a doorknob bearing marks from pliers is removed from the door and placed into evidence). If the item will be collected its location should be documented with photographs. Later, close–up photographs and casting of the tool marks can be done in the laboratory.
When taking a photograph of a tool mark begin with a photograph to show where the tool mark is located in the crime scene. It may be necessary to use both overview and mid–range photographs to clearly show the location of the tool mark in the photographs. If there are multiple tool marks it may be necessary to include numbered evidence markers to differentiate one tool mark from another.
When taking a close–up photograph of a tool mark be sure to place a scale on the same plane as the tool mark. Self–adhesive scales are convenient for photographing tool marks, especially tool marks on vertical surfaces; but a lightweight plastic scale can be taped (using fingerprint tape) to a vertical surface when necessary.
 |
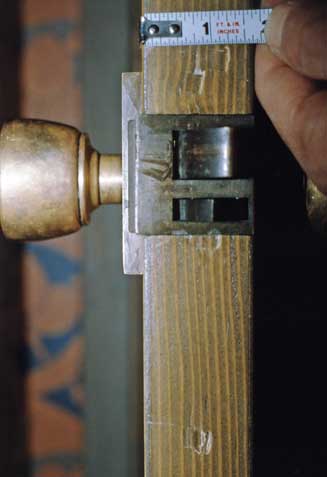 |
Position the camera with the camera’s film plane parallel to the tool mark evidence. In order to get as much detail recorded on the film as possible, position the camera so the frame of the viewfinder is filled with the tool mark and scale. Using a tripod helps with the positioning of the camera and steadies the camera. This is important since depth–of–field is shallow in close–up photographs. Precise focusing can be made with a camera mounted on a tripod.
When photographing with a digital camera all photographs should be taken in color mode. Even if the finished photograph would be better in black–and–white it should still be taken in color when using a digital camera. By photographing in color subtle tones that could be lost when photographing in black–and–white mode will be captured. Later the color digital photograph can be changed into grayscale in a program such as Adobe® Photoshop®.
If photographing with film it is best to photograph tool mark evidence with black–and–white film. Black–and–white film provides more contrast and detail than most color films.
Proper lighting will show detail in the tool mark. Do not attempt to photograph tool marks with an electronic flash positioned on the camera. If you do you will normally get reflection from the object you are photographing. The reflection will obscure detail. The best way to light tool marks is with oblique lighting. Oblique lighting will reduce reflections and show greater detail by creating small shadows within the tool marks. The most effective way to insure you are using the best angles of lighting is “preview the photograph” by looking at lighting from several different angles. To do this, position a strong light source, such as a flashlight, at different angles to find the light angles that reveal the best detail in the tool mark. As you move the lighting you will see the results you will get by looking into your viewfinder. At this point you can photograph the tool mark using the lighting from the flashlight or you can position your electronic flash at the best angles for the photographs.
Fingerprints
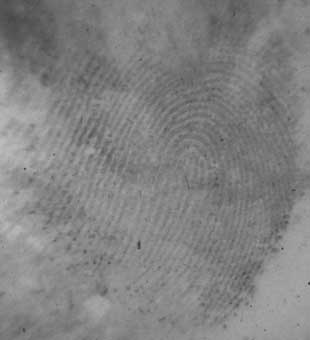
Perhaps the most common form of evidence collected at crime scenes is fingerprints. Fingerprints should be photographed before they are collected on major cases or if the latent may be destroyed when lifting. Occasionally, a latent print can be visible or developed on a surface but cannot be lifted (e.g. a fingerprint in blood). In such a case photographing the latent is the only way to document the evidence.
 |
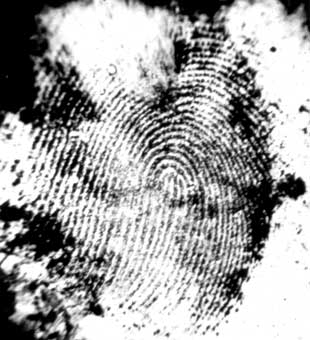 |
Photography can also be used to bring out detail in a latent. Through the use of lighting, filters, processing controls, and enhancement (in a program such as Adobe® Photoshop®) a faint latent fingerprint can be enhanced. This is mostly done by building contrast between the latent and its background.
Digital images
When photographing with a digital camera all photographs should be taken in color mode. Even if the finished photograph would be better in black–and–white it should still be taken in color when using a digital camera. By photographing in color subtle tones that could be lost when photographing in black–and–white mode will be captured. Later the color digital photograph can be changed into grayscale in a program such as Adobe® Photoshop®.
When photographing evidence containing fine detail with a digital camera it is highly recommended the images be captured as RAW files. Raw files are unprocessed data directly from the imaging sensor and saved in their true, 12 or 14 bit color depth. RAW files are read-only files and must be converted to another type after they are processed. It is recommended RAW files be enhanced (in a program such as Adobe® Photoshop®) and then saved as TIF files.
Film
Well–defined fingerprints can usually be photographed with color film. However, black–and–white film provides greater contrast than color film and is preferred for latent print photography. The following is a list of a few black–and–white films that are suitable for latent fingerprint photography.
Normal contrast photographs can be taken using a professional black–and–white film such as Kodak T–MAX or Ilford Delta Professional films. For best results develop Kodak T–MAX film in T–MAX developer and process Ilford Delta Professional films in ILFOTEC HC developer. A little higher contrast can be obtained by increasing the film development time by twenty-five percent.
Some black–and–white films can be processed in color processing machines. You can take these films to color photo labs for processing in their color equipment. Kodak Professional BW400CN and Ilford XP–2 Super are black–and–white films that are processed in color processors. They each have an ISO of 400, are fine grain with good sharpness and resolution, and are processed in C–41 color chemistry.
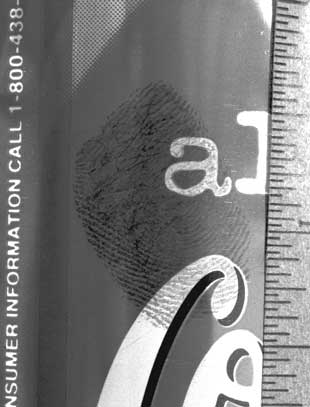
In black–and–white photographs all colors become shades of gray. This can be a problem when two colors become nearly the same shade of gray in a photograph. However, colored filters can be used to increase contrast between colors in black–and–white photographs. Color filters can build contrast by either lightening or darkening the latent print, or by lightening or darkening the background. To lighten a color, the color filter closest to the color is used. To darken a color, the opposite color filter is used. (See the following two tables for information on using filters with black-and-white film.)
Black and White Contrast Filters
Objective: To increase contrast between colors that would normally photograph as nearly the same shade of gray.
Light Information — White light is made up of a mixture of the primary colors—red, green and blue. In theory red, green, and blue light sources simultaneously projected on the same area will be white. Red and green light mixed together makes yellow. Green and blue light mixed is cyan. Blue and red light mixed is magenta.
Light Transmission Law — The filter transmits its own color (lightened in the print) and absorbs (subtracts) its complementary color (darkened in the print).
to Obtain Contrast Between Colors
 |
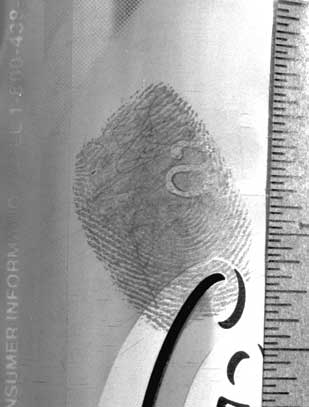 |
For example, a black powdered latent on a blue background would be difficult to see in a black–and–white photograph. However, the latent print can be enhanced by causing the background to lighten by using a blue filter. A ninhydrin developed latent on the back of U.S. currency can be enhanced in two ways by using a green filter. The green ink in the currency is lightened (the background is lightened) and the violet colored ninhydrin developed latent fingerprint is darkened.
Procedures in Photographing Fingerprints
Establish the Location of the Fingerprint
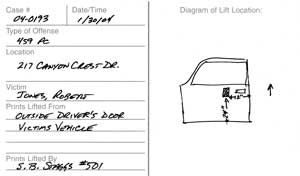 |
If you are going to photograph a fingerprint, the location of the fingerprint must be established. While you could use mid–range photographs to show where each fingerprint is located in the scene, the use of numerous mid–range photographs to show the locations of small items can become confusing. A better technique is to forego the mid–range photographs and use the diagram and notations on the latent print card to identify the original location of each fingerprint. This can be done by including a scale in the close–up photograph of each fingerprint. On the scale write the evidence item number that will be used on the latent print card. Be sure the scale and the item number appear in the close–up photograph of the fingerprint. Then the location of the fingerprint in a photograph can be related to a latent print card on which the fingerprint's location was diagramed and described.
See also the instructional videos "Evidence Photography — Fingerprints"
Close–up Photograph
While there are specialized cameras designed for fingerprints, a 35 mm or good quality digital camera with a macro lens or close–up accessory can be used for fingerprint photography. Using a tripod helps with the positioning of the camera and also steadies the camera. This is important since depth–of–field is shallow in close–up photographs. Precise focusing can be made with a camera mounted on a tripod. Photograph the latent with the camera’s film plane parallel to the fingerprint surface. In order to get as much detail recorded on the film as possible, position the camera so the frame of your viewfinder is filled with the fingerprint and scale.
Exposure
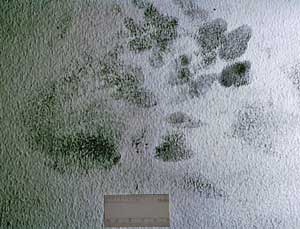
Some fingerprints can be photographed using ambient (existing) light. Ambient light exposures of fingerprints with normal contrast can be exposed using the camera’s exposure system if the fingerprint and its background are of normal reflectance. If the background is lighter or darker than normal, then the exposure should be determined by metering off an 18 percent gray card. For example, when photographing a black powdered fingerprint on a white background, the camera will normally underexpose the photograph and detail in the photograph will be lost. This is because most of the image is white and reflects more light than a normal background. In such a situation you should meter off an 18 percent gray card to determine the correct exposure settings.
 |
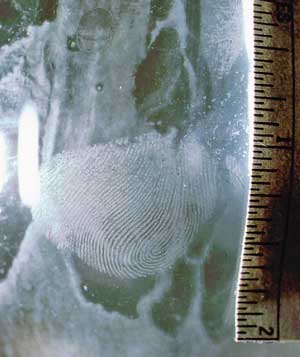
Artificial light (from electronic flash, flood lamps, flashlight, etc.) can be effective in photographing fingerprints. Oblique lighting is used for most photographs of fingerprints. The most effective way to insure you are using the best angles of lighting is “preview the photograph” by looking at lighting from several different angles. To do this, position a strong light source, such as a flashlight, at different angles to find the light angles that reveal the best detail in the fingerprint. As you move the lighting you will see the results you will get by looking into your viewfinder. At this point you can photograph the fingerprint using the lighting from the flashlight or you can position your electronic flash at the best angles for the photographs.
Whether using available light, electronic flash, or other illumination sources, bracketing of exposures should be considered. Bracketing may reveal more detail in “low contrast” or faint fingerprints. Underexposing the film will separate the steps on the white end of the gray scale. Overexposure will separate the steps on the black end of the gray scale. The latitude for black–and–white film is generally two f–stops underexposure and six f–stops overexposure.
 |
Photographing Specific Types of Fingerprint Subjects
Dusted fingerprints with good visible detail can usually be photographed without special lighting techniques.
Fingerprint impressions in soft substances (e.g., wax, putty, clay, adhesive tape, grease, or dust) require the use of oblique lighting at a low angle. This will create small shadows in the impression. Preview the effect with a flashlight.
Fingerprints on porous surfaces (textured wall coverings, wood, brick, etc.) may need almost a 90–degree lighting angle to avoid the creation of shadows in the surface’s texture, which would interfere with the recording of fingerprint detail. Preview the effect with a flashlight. Fingerprints on glass (windows, drinking glasses, etc.) can be photographed by placing a white card behind the glass and using a low oblique angle of light. They can also be photographed by using transmitted (back) lighting by positioning a diffused light source behind the glass.
Bloodstain Photography
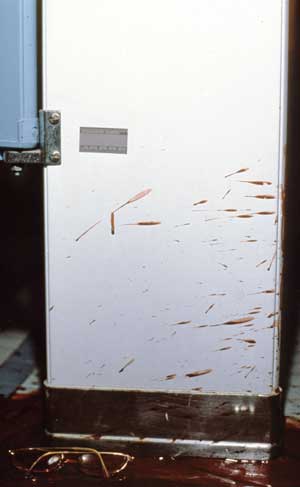
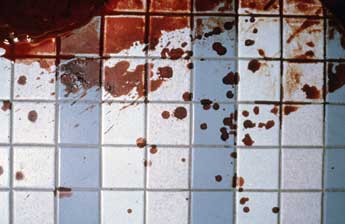
Bloodstain (also referred to as blood spatter) at a crime scene can tell the story of what occurred during an assault or other type of bloody crime scene. Bloodstain analysis can determine such things as where victims and suspects were positioned when bloody blows occurred and events during the assault (e.g., which victim bled first). The crime scene photographer is responsible for photographically documenting a bloodstain scene in such detail that a bloodstain expert can later do an analysis of the bloodstain evidence. These photographs will include areas of bloodstain that indicate a pattern. An example of a pattern area is shown in the photograph below.
 |
When photographing bloodstain scenes use color film to establish which substances in the photograph are bloodstains. Black–and–white film records reflected light in shades of gray, so when using black–and–white film it may be difficult to determine what substances in the photography are actually blood stains.
Black–and–white film may, however, be used for high contrast photographs or with colored filters to increase contrast between the background and bloodstain. For example, if a bloodstain is located on a dark surface you can use black–and–white film and a red filter to lighten the bloodstain, or if a bloodstain is located on a light surface you can use black–and–white film and a blue filter to darken the bloodstain.
When photographing bloodstains you must first show the location of the bloodstain with mid–range photographs followed with closer views to show the bloodstain patterns. When taking close–up photographs of bloodstains be sure to place a scale on the same plane as the bloodstain. Self–adhesive scales are convenient for photographing small areas, especially vertical surfaces, but a lightweight plastic scale can be taped (using fingerprint tape) to a vertical surface when necessary.
Position the camera with the camera’s film plane parallel to the bloodstain evidence. In order to get as much detail recorded on the film as possible, your camera should be positioned so the frame of your viewfinder is filled with the bloodstain and scale. Using a tripod helps with the positioning of the camera and steadies the camera.
This is important since depth–of–field is shallow in close–up photographs. Precise focusing can be made with a camera mounted on a tripod.
 |
 |
 |
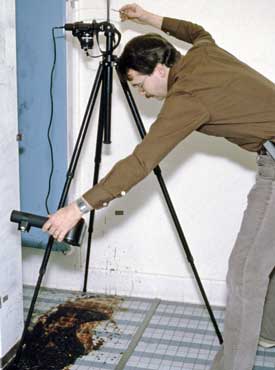
Proper lighting will show the detail of the bloodstain patterns and evidence. Do not attempt to photograph bloodstain with an electronic flash positioned on the camera. If you do, you will normally get reflection from the surface you are photographing. The reflection will obscure detail. The best way to light bloodstain is with oblique lighting. Oblique lighting will reduce reflections and show greater detail in the evidence. Use very low oblique light angles when dealing with bloodstain on fabrics. The most effective way to insure you are using the best angles of lighting is to “preview the photograph” by looking at lighting from several different angles. To do this, position a strong light source, such as a flashlight, at different angles to find the light angles that reveal the best detail in the tool mark. As you move the lighting you will see the results you will get by looking into your viewfinder. Position your electronic flash at the best angles for the photographs.
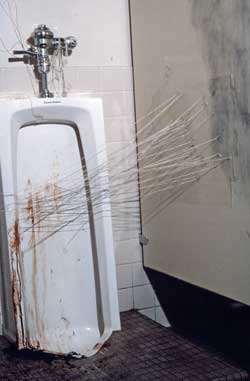
Some investigators will use strings to determine the origin of bloodstain at a crime scene. The origin is usually the location of a bloody blow in an assault. The technique involves measuring a group of blood drops on a surface, such as a wall, to find the angle that each drop of blood was traveling when it struck the surface. Strings are attached to the points each blood drop struck and the strings are then angled back to an approximate point of origin. Photographs are then taken to document the demonstration.
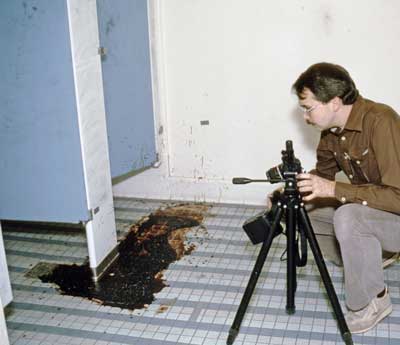
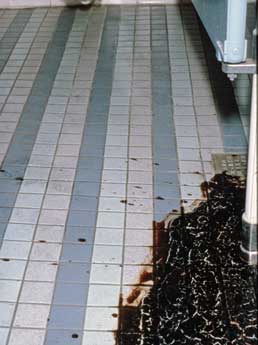
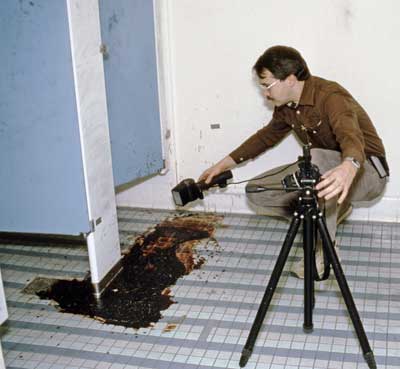
Photographs can also be taken to illustrate theories involving bloodstain evidence, such as the position of a victim at the time of a bloody blow. In the illustrations below photographs are used to show the approximate location of the victim’s head at the time of a bloody blow. The first photograph shows an area of the floor that has a void pattern. The void pattern is an area without bloodstain. This pattern was caused when a partition blocked bloodstain that traveled through the air from the point of origin. The second photograph was taken without moving the camera, but with the electronic flash positioned where it was believed the victim’s head was located when the bloody blow occurred. The second photograph shows a shadow, caused by the partition, that matches the void pattern.
 |
 |
 |
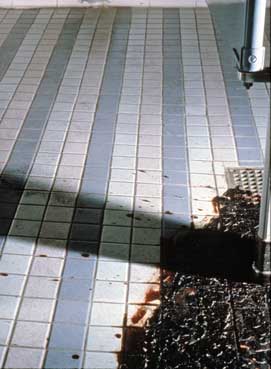 |
These two photographs can be used in court to help illustrate the testimony given by a bloodstain expert regarding the position of the victim’s head at the time of the bloody blow.
Photographing Luminol
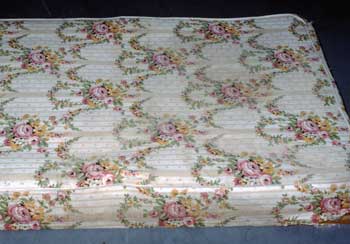 |
Luminol is a presumptive test for blood usually used to reveal bloodstain patterns on surfaces where the bloodstain has been cleaned or is not readily visible. Luminol reacts with the iron in hemoglobin causing the area with traces of blood to become luminescent. The luminescence is documented with photography. Other chemiluminescent chemicals, such as fluorescein, can be used in a similar manner.
When photographing luminol you will need a camera with “B” setting, a lens with a f/1.8 or larger aperture, a locking cable release, a tripod, an electronic flash, a roll of ISO 400 color print film, and a timer.
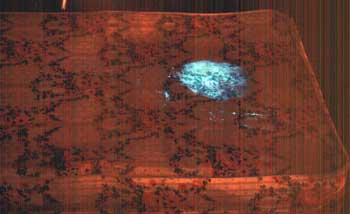 |
To photograph the results of luminol inside a building you would first turn off lights in the area and spray a fine mist of a luminol solution over the area to be searched. If luminescence is observed, note its location. Next, turn on the room lights. Set up a camera, equipped with a locking cable release and an electronic flash, on a tripod. Take a normal photograph of the area. Without moving the camera, advance the film and adjust the lens aperture to underexpose the next photograph by two f–stops. This can be done with an automatic camera by adjusting the exposure control setting (to a setting of –2) or with a manual camera by closing down the lens aperture (e.g. if the normal flash photograph requires a f/5.6, change the aperture to f/11). Set the shutter speed to “B.” With the room darkened, open the shutter (firing the electronic flash) and lock the cable release to hold open the shutter. Open the lens aperture all the way while taking care not to move the camera. Lightly spray luminol on the area in the view of the camera. You will need to spray the area every twenty seconds to maintain luminescence. Avoid over spraying, which may cause patterns on smooth surfaces to run or may cause background luminescence and reduce needed contrast. Close the shutter after about one minute.
A scale can be used in the luminol photograph. Attach small pieces of copper wire on the one inch–marks of a scale and place the scale in the area to be photographed. The copper wire on the scale will become luminescent when sprayed with Luminol.
Bullet Path Photography
The suspected path of a bullet can be illustrated with a variety of techniques. Colored strings can be strung to illustrate bullet paths. Reflective string can also be used—the string will glow when a flash photograph is taken. Fiberglass rods or wooden dowels can also be used, especially to show how a bullet passed through an object or wall. With these techniques you will need to set up the strings or rods and photograph the area from several angles to document the bullet paths.
See also the instructional video "Photographing Bullet Trajectories"
Another technique for photographing the suspected path of a bullet is to use a laser beam. As with the other techniques, the bullet paths illustrated with laser beams are documented with photographs.
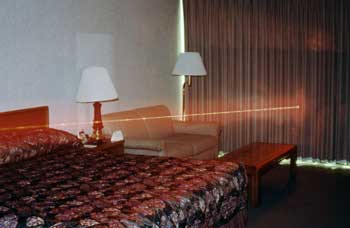 |
When photographing a bullet path illustrated with a laser you will need a camera with “B” setting, a lens with f/1.8 or larger aperture, a locking cable release, a tripod, an electronic flash, a roll of ISO 400 color print film, and laser.
To photograph a bullet path using a laser you first position the laser to illustrate the suspected bullet path. Then set up a camera, equipped with a locking cable release and an electronic flash, on a tripod. Adjust the lens aperture to underexpose the photograph by one or two f–stops. This can be done with an automatic camera by adjusting the exposure control setting (to a setting of –1 or –2) or with a manual camera by closing down the lens aperture (e.g. if the normal flash photograph requires a f/5.6, change the aperture to f/8 or f/11). Set the shutter speed to “B.” Turn on the laser. With the room darkened, open the shutter (firing the electronic flash) and lock the cable release to hold open the shutter. Open the lens aperture all the way while taking care not to move the camera. Cause the laser beam path to show in the photograph by either spraying photographic fog in the path of the laser beam, or by slowly moving a white card along the laser beam path with the card positioned so the laser dot on the card reflects toward the camera. When you finish tracing the laser beam path return to the camera and close the shutter.
Summary
This chapter has given you a variety of techniques for photographing some of the more common types of evidence found at crime scenes. However, crime scene conditions and types of evidence vary greatly from one crime scene to the next. To successfully photograph evidence you must be experienced and knowledgeable in both photography and forensics, be willing to experiment with lighting, be a problem solver, and be creative.
 Evidence Photography — At the Crime Scene Copyright: © 2014 by Steven Staggs. Copyright for this article is retained by the author, with publication rights granted to the Crime Scene Investigation Network. This is an Open Access article distributed under the terms of the Creative Commons Attribution-NonCommercial-NoDerivatives 4.0 International License which permits unrestricted noncommercial use, distribution, and reproduction, provided the original work is properly cited and not changed in any way.
About the Book

The information presented in this article is from the book
Crime Scene and Evidence Photography, 2nd Edition © 2014 by Steven Staggs.
About the Author
 For 34 years Steven Staggs was a forensic photography instructor and trained more than 4,000 crime scene technicians and investigators for police and sheriff departments, district attorney offices, and federal agencies. He was also a guest speaker for investigator associations, appeared as a crime scene investigation expert on Discovery Channel's Unsolved History, and provided consulting to law enforcement agencies.
Steve has extensive experience in crime scene photography and identification. He has testified in superior court concerning his crime scene, evidence, and autopsy photography and has handled high profile cases including a nationally publicized serial homicide case.
Steve is the author of two books on crime scene and evidence photography, the text book Crime Scene and Evidence Photography and the Crime Scene and Evidence Photographer's Guide. The guide is a field handbook for crime scene and evidence photography, which sold over 10,000 copies and has been in use by investigators in more than 2,000 law enforcement agencies.
Steve retired in 2004 after 32 years in law enforcement, but continued to teach forensic photography and crime scene investigations at a university in Southern California.
Article submitted by the Author
Article posted: September 22, 2104

