Photography of Gunshot Wounds
Patrick E. Besant-Matthews, M.D.
-
Editor's note: This paper was presented by Dr. Besant-Matthews at an Evidence Photographers' International Council (EPIC) annual conference held in Tempe, Arizona in November 1996.
The majority of EPIC members are full time photographers or use photography as a routine part of their work. Accordingly there is little need to describe how to take a photograph, but there is a need for a list of pointers to help those who do not photograph gunshot wounds frequently.
See also the instructional videos on "Evidence Photography"
Just like crime scene photos there is a need for "walk-up" or introductory photographs.
Just as a photograph of a car will have less value if there isn't a view to show where it came to rest after a crash, a close-up of a gunshot wound will have less value if we don't know where on the body surface it was located.
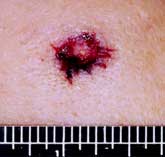
So we must take one or more photographs to show where each wound was located, and what each of them looked like. In short, make sure that the close-ups of the various wound can be easily identified and distinguished from one another unless there is an obvious landmark in the field of view, such as an ear or an eye.
If there's only one entry wound, or just an entry and an exit, then it's relatively Simple, but if there are multiple entrance and exit wounds you will probably need to take a series of photographs, such as: (a) the front of the body (b) the back of the body (c) one or two sides if there are any wounds in these locations (d) enough closer views to show the overall characteristics of individual wounds (e) close-ups of each wound, including one with a scale of size.
If there are numerous wounds, for instance 20-30 small caliber wounds that look much alike, it may be necessary to assign each a number and identify each wound with a fine marking pen or small adhesive label.
Scales of size are important.

The reason we often have to take one with and one without a scale is that if you put one in an attorney may claim that it covered something important, and if you don't put one in he may object because it wasn't there.
You don't necessarily have to take each wound in close-up with and without a scale so long as you have at least one fairly close-up photograph to show that nothing was covered by the scale when you did use it. The possible presence of soot and gunpowder are the main reason for this, but there are others.
It's up to you to decide if you want to use a scale marked in inches or centimeters. Either will work however the problem is that the average juror does not think in centimeters, only in inches. If you don't believe me, simply testify the a wound was located 80 cm below the top of the head, and you will see blank looks. If you say it was 31 ~ inches below the top of the head they will understand.
I know of one case in which a wound of the chest was described by a pathologist as being 5.0 x 5.5 cm in dimension, and nobody noticed until trial that the shotgun slug which caused it only had a diameter of 3/4 inch.
The metric system is great, and the sooner we adopt it the better, however the fact remains that most jurors in the US do not think in terms of centimeters, kilometers, joules, milliliters and ergs.
A dab of Vaseline or thick ointment will often hold a scale in position on the body surface while a photograph is taken.
In most cases it's highly desirable to document the body surface as completely as you can.
I'm not advocating a detailed view of each ear canal and the anus to show the absence of wounds in obscure locations, but it is most desirable to fully document the surface of the body including the back and sides to show the absence of wounds, particularly in high profile cases. Suppose for instance that a teenager of one racial group is shot by a police officer of another racial group, and that the usual racial allegations and slurs arise. If the bullet came to rest under the skin of the back and was recovered by making a 3/4 inch cut in the skin, than if the body is examined for a second time and the clothing is lost, there will be claims of a wound in the back and a cover-up. In such cases having several photographs to show that there was no wound of any kind in the back is simply invaluable.
When the average bullet travels into the body it generally follows a path that is close to being a straight line or Slightly curving.
The point is that, in most cases, the direction of the bullet within the body is easily recorded by inserting a stainless steel probe (or failing this a disposable dowel rod) in the wound track and photographing the angle in all three axes, front/back, right/left and up/down. In the event a bullet enters, strikes something such as bone and then deviates, the probe should be adjusted to best show the angle at which the bullet entered. Then a note should be added that it deviated before it exited. It would be worth recording the angles at which it exited if it did anything noteworthy after leaving the body.
Properly taken photographs should take care of the angles, but if nobody else takes the trouble to do so, you could measure the approximate angles (to the nearest 5° or so) using the standard "standing-at-attention-palms-to-the-front" anatomical reference position. (e.g. The bullet path was from front to back, from right to left at about 45° with respect to the front-back plane, and from above downwards at about 30° with respect to the horizontal.)
There are two main types of residues associated with gunfire, visible and invisible.
The visible ones that concern us most are gunpowder and soot. If you observe either or both of these on the skin or clothing, be sure to take photographs to document their extent and distribution.
I won't go into invisible residues, such as primer residues and lead dust.
Always examine and prepare to photograph the hands of an injured person or victim in a good light, especially if the weapon was within a few feet of the person at the time it was discharged.
In suicides for instance, gases and soot leaking from the cylinder-barrel interface (so-called "cylinder flare") of a revolver may be found on the hands.
Always look at the clothing if there is any.
The clothing is often the most important evidence.
Bullets often pass through clothing and miss the wearer, but suppose you had a police shooting and there was a bullet hole passing upwards through the side of a shoe without injuring the foot. People overlook such things. Always look for soot and gunpowder on the outermost layers of clothing and in your mind try to correlate each wound with the holes in the clothing. Don't worry if you can't make everything fit, clothing is often wrinkled, folded or out of position, resulting in more than one hole per bullet. The more bullets the more difficult such a correlation becomes, and clothing is even worn inside out. Don't worry about this because you're not trying to do the work of the crime lab, but suppose one bullet went through an arm and that there's only one hole in a sleeve then might there not be a bullet in the clothing? Always look at the clothing and photograph anything you see.
The object of wound documentation is to provide data necessary for solving problems, it is not an exercise in human anatomy.
A typical courtroom situation is that a bullet passed upwards at about 10° through a door frame, and exited the frame at a point centered 38 inches above the floor. If you noted that the bullet passed upwards into a deceased cocktail waitress at the same angle, and entered her body through a wound located (allowing for 2 inch heels) 44-1/4 inches above the floor, then it doesn't take a Ph.D. in mathematics to know that the side of her body, through which the bullet entered, was located about 3 feet from the door frame at the time the bullet struck, not 8 feet as claimed by the defense. If you have localized the hole in relation to some meaningless anatomical landmarks, and an attorney subsequently asks you how far above the floor the wound would have been, assuming that she were upright and carrying a tray, you will be unable to answer the question with reasonable accuracy. Common errors include:
- Measuring to the edges of wounds instead of to their centers. You can get away with this for a single wound, but if there are several the distances between them will seldom add up without superhuman organizational and mathematical effort. Any calculation of angles will almost invariably be based on the center of the line along which a bullet passed, or close to the center of individual wounds which are not asymmetric in nature. The only point to consider in this regard is what you are going to do if say a bullet enters at one end of wound that is perhaps 1 1/4 inches long. Personally I state where it entered and then describe a greater extension of the wound in one direction and explain that it is due to angulation, or bone, or whatever it was.
- (Use of illogical landmarks. If the gunshot wound is high on the left forehead almost into the head hair then it should be related to the top of the head and the midline of the head and to the ear canal, not to the base of the right heel. If the deceased is found to be 72 inches tall and the wound is 4 inches below the top of the head you ought to be able to deduce the distance above the heel if someone should ask, and can convince you or asks you to assume, that the victim was standing erect when he was injured. Note therefore, that distances below the top of the head and above the heel should be measured vertically, not around the side of the legs and across curvatures of the chest and abdomen. Assume that the deceased is standing and that you are measuring the positions with a straight surveyors rod.
- If measurements are made around a body curvature, make this fact clear in the description. Failure to do so will make a wound recorded as being 5 1/2 inches to the left of the front midline of the face sound as if it's out in space somewhere in space on the left of the head, rather than just in front of the upper part of the left external ear. The external ear canals themselves are good landmarks on the sides of the head. The notch at the top of the breastbone and the outer comers of the eyes are also examples of landmarks which are not going anywhere.
- If a wound is found on a mobile part of the body, for example near an elbow, don't be satisfied with recording that it is 38 inches above the base of the heel. You must also relate it to a fixed landmark in its own area, in this case probably the elbow joint. It may come out in court that the victim was shot with his hands held above his head. Now how far would the wound be from the heel?
A common failing is to note the direction of a track in the chest, but not in the adjacent arm which the bullet passed through on route to the chest. The inexperienced person may say that the position of the arm is unpredictable and/or unknown, which sounds plausible but misses the point. If the bullet track was horizontal in the chest and 20° upwards in the adjacent arm then the arm must have be angled about 20° away from the vertical at the moment of injury to line up. Failure to give estimates of the direction of wounds in limbs often prevents the reconstruction of events and prevents experts from estimating the relative position of body parts. - Do not measure the location of one bullet wound to another, and report something like ..."4 inches below and 1 inch to the right of the wound just described there is a gunshot wound of entry". If you make a mistake with the first you will automatically mess up the second.Each wound should be recorded with respects to fixed landmarks, such as the base of the heels, the top of the head, the center line of the body or limb, etc.
When a person is standing it's easy to orient a camera with respect to the head.
However when a living or dead victim is lying on a stretcher or autopsy table with the head on a pillow or a head block the head assumes an unnatural attitude.
It is a convention that the horizontal in the head runs from the lower edge of the bone of the eye sockets to the upper edge of the bony ear canal. This is called the Frankfort plane. If this plane is held parallel to one edge of the viewfinder when a photograph is taken the resulting print will appear natural.
When you put the scale of size and case number on or next to the victim, be sure to orient it so that it's the natural reading position.
For instance if a victim is standing the numbers and letters should be parallel to the floor. If the victim is lying down the numbers and letters should still be parallel to the floor. If you put them vertically and take a picture, when a juror picks up the photograph he or she will instinctively put the wording horizontal and sense that something is wrong and that the person appears to be leaning against a sheet or is about to slide to the floor. If you put the scale parallel to the floor the juror will immediately see that the victim was lying down when you took the picture.
Many emergency department photographs are taken in less than ideal circumstances.
For instance you may be crammed into a narrow space between two stretchers and a curtain. In such circumstances make sure you keep the camera and film parallel to, or at right angles to, the floor. If you tilt the camera the victim will appear to be lying on a tilted stretcher and seemingly about to fall on the floor. Jurors will try to work out what's "wrong", instead of concentrating on the injuries depicted.
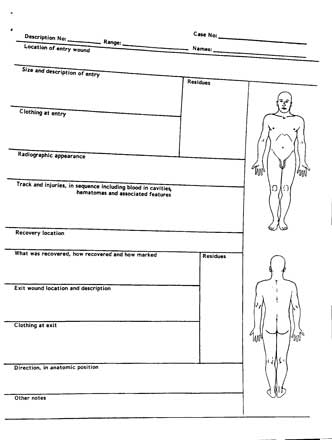
Use a form which to help you to document gunshot wounds
Attached is a form which will help you to document gunshot wounds properly and thoroughly. If a victim is alive you may not be able to fill in all the blanks. If so simply fill in everything you can and make a note in the blanks to show you didn't omit something by accident.
Use one form per bullet. I have provided one as an example, and a blank to copy. What notes you make about the camera, lens and film a personal or local decision.


About the Author

Patrick Besant-Matthews, M.D. is a highly acclaimed and popular consultant and lecturer in the area of forensic medicine and criminalistics. He is the former Deputy Chief Medical Examiner for Dallas County, and Chief Medical Examiner for Seattle/Kings County.
He has presented thousands of programs to nurses, physicians, law enforcement officials, and various scientific groups. He is also an experienced expert witness, and is highly skilled in the area of medical photography. Dr. Besant-Matthews was an integral contributor to the origination of the American Association of Forensic Nurses. His expertise in his field, his sense of humor, and his flair for drama combine to produce a highly enjoyable seminar.
 Photography of Gunshot Wounds Copyright: © 1996 by Patrick Besant-Matthews, M.D.. Copyright for this article is retained by the author, with publication rights granted to the Crime Scene Investigation Network. This is an Open Access article distributed under the terms of the Creative Commons Attribution-NonCommercial-NoDerivatives 4.0 International License which permits
unrestricted noncommercial use, distribution, and reproduction, provided the original work is properly cited and not changed in any way. Based on a work at https://www.crime-scene-investigator.net/photography-of-gunshot-wounds.html.
Article submitted by the author. The Crime Scene Investigator Network gratefully acknowledges the author for allowing us to reproduce the article .
Article posted September 24, 2019

